Following is a complete list of materials required to build the Touchable Speaker. Each section will call out the materials used in that area.
| Qty | Description | Vendor | Part # |
|---|---|---|---|
| 1.75 | 3/4" Premium White Birch Plywood | Dakota Hardwoods | pw32503905 |
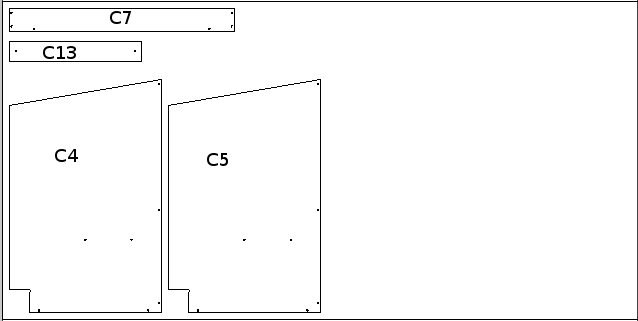
All of the stock is intended to be cut on a Shopbot CNC Router. The files are available Here. Each file was programmed with x-axis and y-axis 0 being the very corner of the stock. The z-axis 0 should be the top of the material. The filenames first number indicates the sequence they should be run, and the second number is the bit that should be used. Also programmed thickness of each stock is labeled below, you may need to cheat the z axis to adjust for your material. Here are the sequences for each piece of stock.
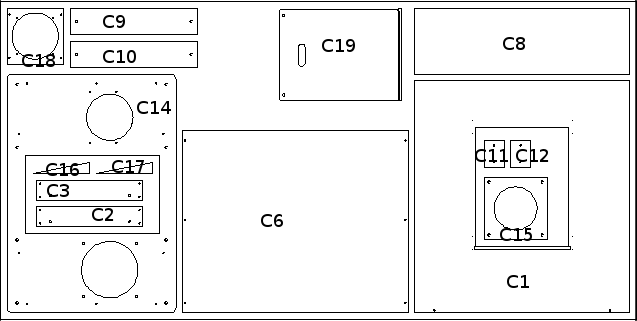
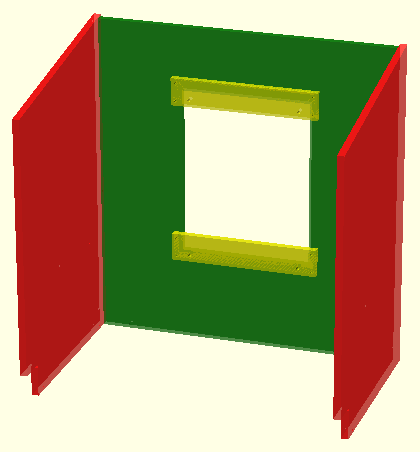
All holes in the following section will need to be countersunk. Attach C2 and C3 to C1 by lining up the pilot holes. Then attach C4 and C5 to C1 while keeping the bottom flush as shown in the image below
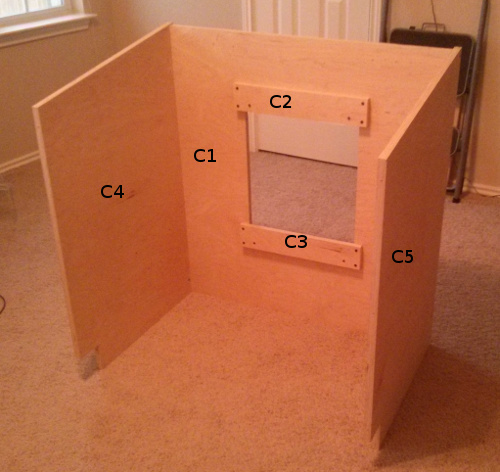
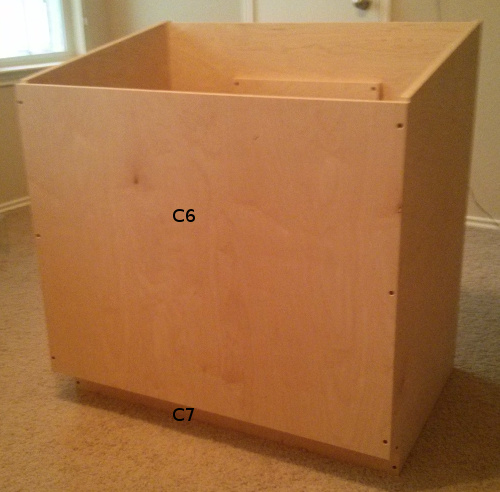
Attach C6 and C7 to the assembly, again making sure it is flush to the bottom edges.
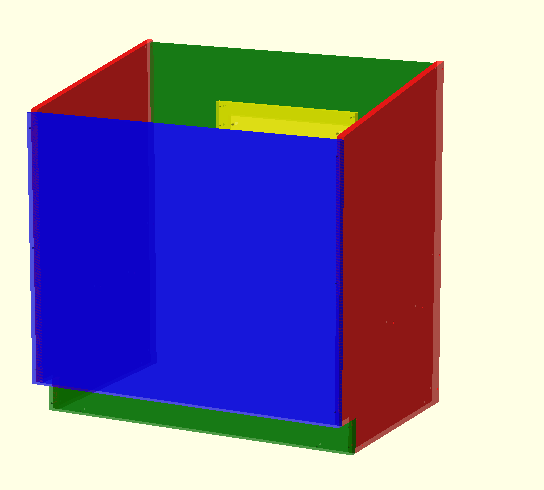
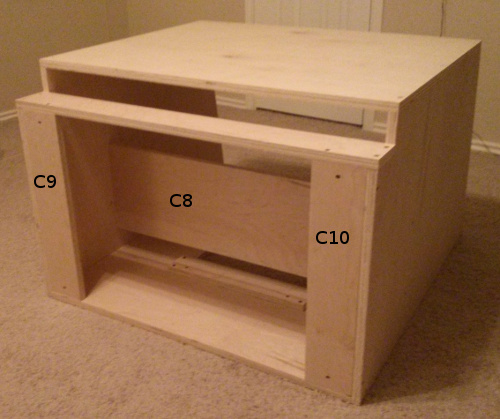
Now attach the internal shelf C8 to the main assembly. Then attach the C9 and C10 to the assembly.
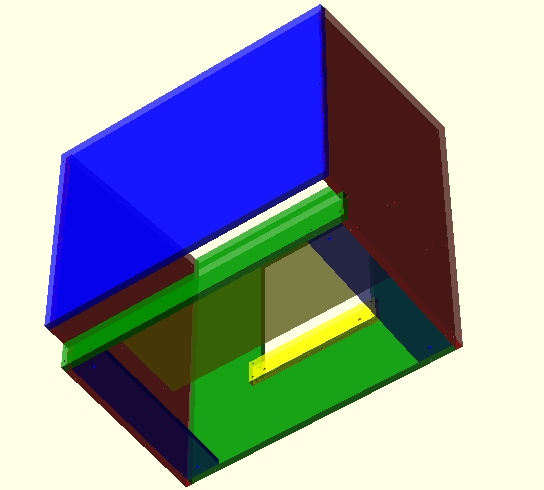
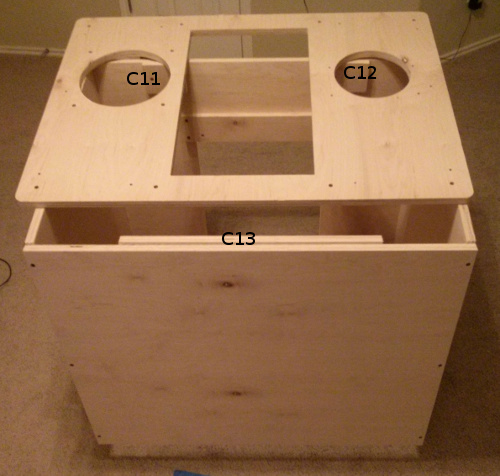
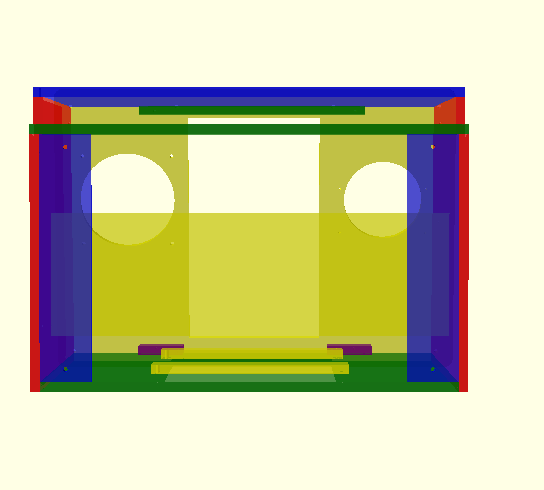
Now temporarily place C14 on the top of the cabinet as a reference. Then attach C11 and C12 near the back flush with the bottom of the C14. And finally attach C13 near the front flush with the bottom of C14.
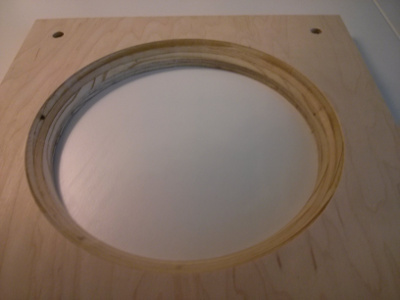
Now take C15 and run a 45 degree chamfer router bit around the inside of the circle. Try to chamfer about 1/2" inch down leaving 1/4" that is vertical.
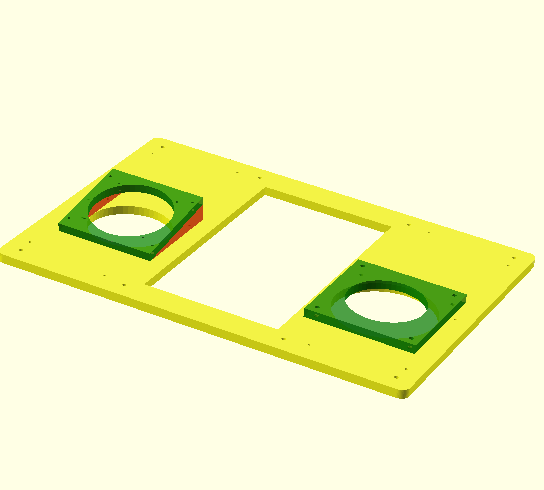
Take C14 and sand it well, then paint it Parakeet Green with several coats. Now take C14 and place it with the larger of the big circles in the bottom right. Take 1/4-20 inserts and screw them into the 4 holes around the larger circle and then bolt C15 to C14 using 1 1/4" bolts keeping the chamfer facing C14. Now take C16 and C17 and screw to C14 on the other large circle. Then take the 8" speaker and mount it to C18 using #8 nuts and bolts. Finally screw C18 to the remaining asssembly.

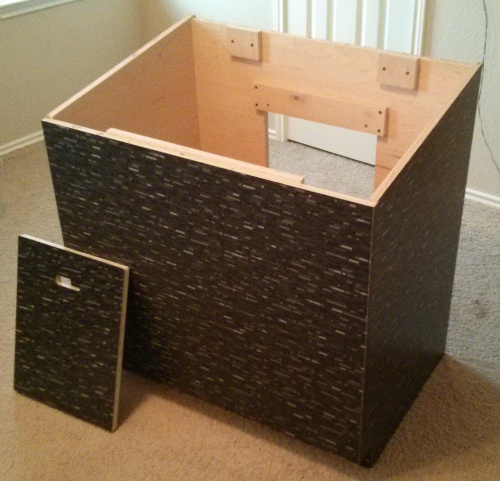
Now that the majority of the cabinet is built it's time to laminate it. Before lamination a flush trim router bit and/or a sander must be used to make all the faces smooth and flat. We need to laminate the base of the cabinet and don't forget the back door C19
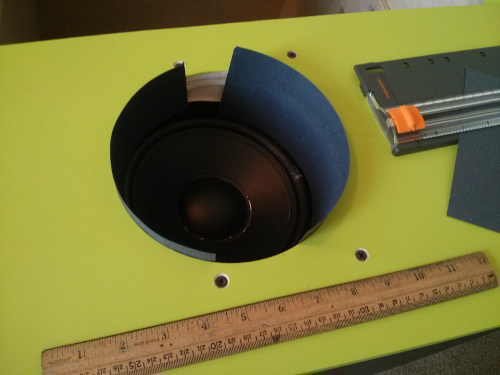
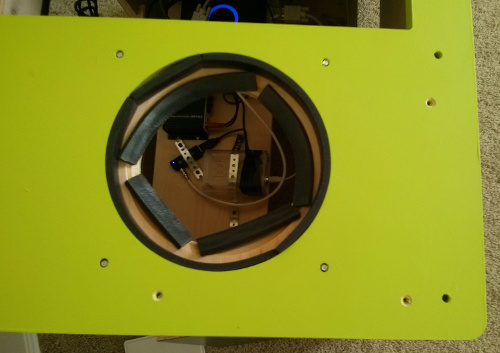
First we take a piece of black construction paper and cut it into 4 pieces. Take each piece and glue to inside of speaker hole on C14. The pieces need to reach down to nearly touching the speaker and will over hang above C14. Once all the pieces are glued and dried then take a razor blade and flush cut with the top of C14.
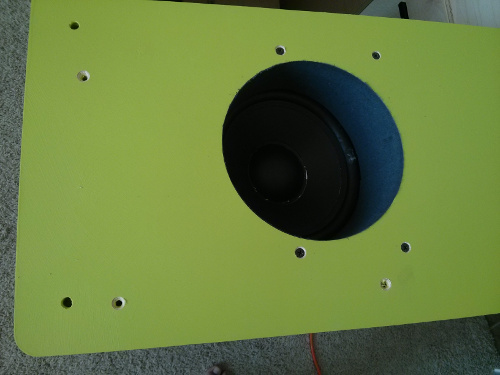
Take weather stripping and place it around the larger circle as shown below
Now take the monitor out and attach the metal rails on all four sides that came with the monitor. Mount the rails as far back on the monitor as possible, then screw the monitor in place with number 8 x 1/2" #6 screws on the rails. Finally attach two straps with 1/2" #10 screws as an assurance that the monitor will stay in place.
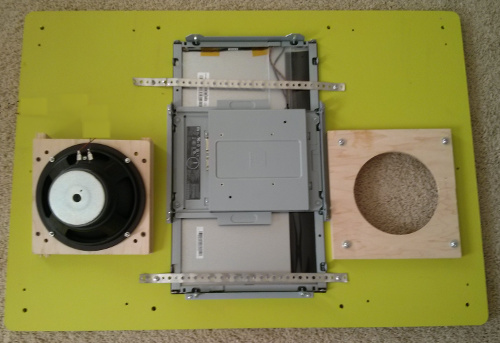
Take the printed speaker cone and attach the excitor using M4 nuts and bolts. Then attach 2.5' lengths of wires to the terminals on the printed speaker and the high performance speaker.

| Qty | Description | Vendor | Part # |
|---|---|---|---|
| 1.00 | Zotac Intel Core i3-3120M 2.5GHz HM76 4GB DDR3 500GB HDD with Wi-Fi A&V&GbE Mini PC Barebo | Amazon | ZBOX-ID91-PLUS-U |
First step is to install Ubuntu. First download Ubuntu 14.04 LTS at here. Then you need to write the ISO out to a USB key using this process. Then boot up into the USB key and select "Install Ubuntu". Follow the setup guide presented but when you get to the user section, name the user "speaker" with the password "speaker" and select the automatic logon at startup option. Please do not select a different password or username, they are not really used for security and recovering them is quite difficult. Also make sure you connect to the internet and get all updates during installation.
Once the computer starts click the ubuntu logo in the top left corner and type "Brightness & Lock" and select the control panel by that name. Inside this control panel, make sure the "Dim screen" option is unchecked. The "Turn screen off when" option should be put to "Never". The "Lock" option should be set to "OFF", and finally the "Require my password when waking" option should be unchecked. Then you can close the control panel.
Click on the ubuntu launcher in the top left corner and type "Software & Updates". Once the control panel is open then click on the "Updates" tab. Inside the updates tab change the "Automatically check for updates:" field to "Never".
Now open a terminal by clicking on the launcher icon and typing "Terminal". Once open type the following command "sudo apt-get install git git-gui python3-pip" It will prompt you for your password and then ask if you are sure, type "y". Once that operation is complete type "sudo apt-get install python3-gst-1.0". Then run the following command "pip3 install pygame". Now let's pull down the software. On the command line type "git clone https://[your username]@bitbucket.org/messelman/py_touchable_speaker.git ./speaker", note that the your username needs to be replaced by your own username. The last thing we need to do in the terminal is set up for a nightly reboot. In the terminal type "sudo crontab -e", it will ask for your password which should be "speaker". Then it will bring you into an editor, if it asks for you to select an editor select "nano". At the bottom of the file add the following two lines:
Finally save your changes with Ctrl+o and then the Enter key, finally exit with Ctrl+x. Once that is complete write the following command on the terminal "sudo adduser speaker dialout". In the terminal now type "sudo nano /etc/default/apport" This will bring up another editor. In the window change "enabled=1" to "enabled=0" then save the changes with Ctrl+o and exit with Ctrl+x.
Now we're going to set up the auto-start feature for the software. Click the Ubuntu logo in the top left and type "Startup Applications" and enter the control panel. Now click the add button and type the name "touchable_speaker" then browse for the command. The command should be "/home/speaker/speaker/launch_main.py". Finally click the "Add" button and close the control panel. Now reboot the computer by clicking on the gear icon in the top right corner of the computer.
Now we're going to enable the touchscreen monitor support. Make sure the touchscreen USB cable is unplugged from the computer during the following steps. Download this package to the desktop of the computer and unzip the folder. Open a terminal and switch to the directory you just created with "cd Desktop/elo_support". Then type "sudo mikesinteractives.sh", it will prompt you for the password. Now reboot the computer using the gear icon in the top right of the computer. Once it is rebooted, plug in the USB cable between the computer and the touchscreen. Open a terminal and type "sudo /etc/opt/elo-mt-usb/elova", this will bring up a little tutorial that requests you to touch the dots on the screen. After clicking a few dots the screen should be fully calibrated and functional, you can test by trying to click on icons and seeing if it responds.
sudo apt install gstreamer1.0-plugins-bad. Sudo apt install gnome-tweaks Sudo apt install gnome-shell-extension-manager Sudo apt install gnome-shell-extensions. Open Firefox and go to “https://extensions.gnome.org”. Install browser extension. Search for “Disable Gestures 2021” and turn it on.
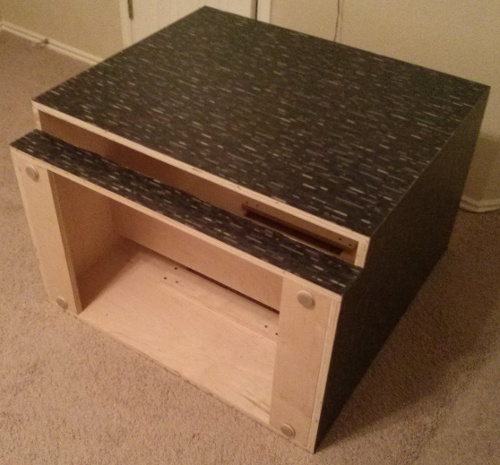
Turn the cabinet over and insert 4 flange inserts into the 4 corners of the base. Then screw in the feet into each flange nut.
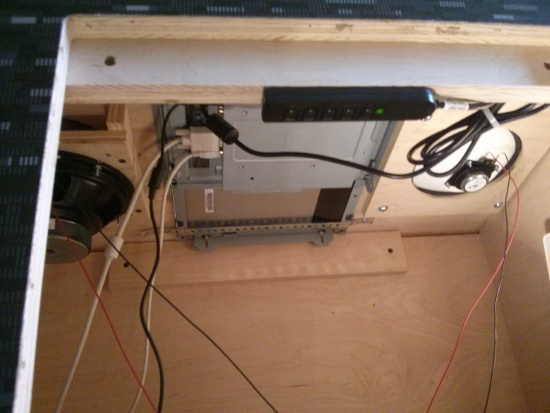
Mount the computer and Lepai audio amplifier with #6 screws. Finally mount the power strip with some #4 screws and then I use sheetrock screws to trap it in place.
Now we can start running wires.
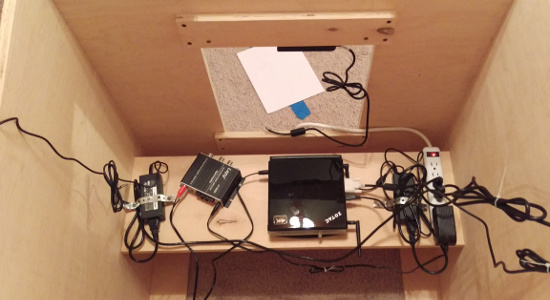
Tuck the wires that we had hanging over the top into the cabinet and place worktop assembly on top of the cabinet. Install the 10 screws that mount the worktop to the cabinet and place the touchable speaker into the assembly. Hook up the speaker wires to the amplifier, the touchable speaker is the left channel. Then connect the 4 different cables into the touchscreen (VGA, USB, button panel, and power).
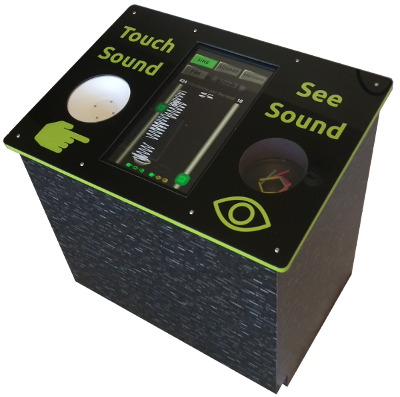
There are two options for generating the artwork for this exhibit. Both options suggest a 1/4" thick acrylic top. The first option is to have a sign company print and cut this file. In that file the pink is to be cut and the white is to be left transparent. The second option is to have this file printed and cut it yourself on a shopbot. In this image the white is intended to be transparent. This image also has some calibration dots to help align the artwork with the shopbot. The shopbot cut files are in the acrylic folder above, make sure you double check the dxf to help with orientation. Mistakes are expensive here. Now cut up some brightly colored straws and place on the right speaker. Then screw in 8 1/4-20 inserts into the worktop and mount the artwork.
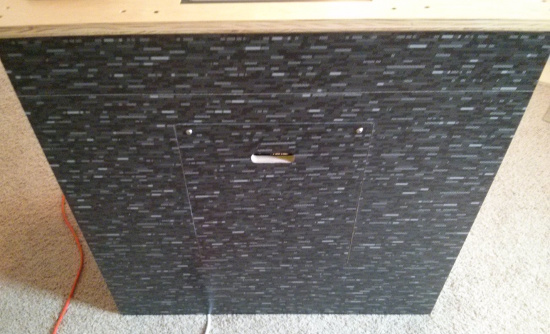
Screw in two 1/4-20 inserts into the two holes in C2. Put the door in place and secure with two bolts
Depending on the space this exhibit is installed in, the audio volume levels need to be adjusted to appropiate levels. The MP3 music is fixed at a certain volume, so adjust the volume knob on the amplifier until the music is at the right level. After that is done follow the procedure below to adjust the tones to appropiate levels.
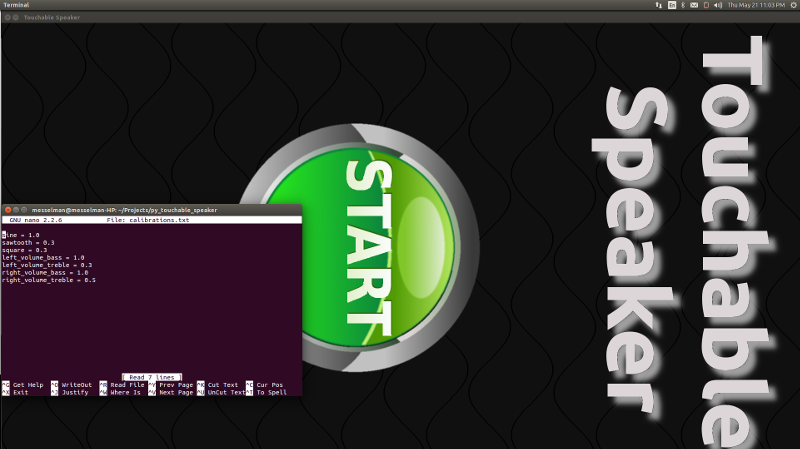
Attach a keyboard to the computer when it is running and press the "f" key to exit fullscreen mode. Now you should be able to click the Ubuntu icon in the top left of the screen and type in "Terminal". In the terminal type "nano ./speaker/calibrations.txt" and this should open up a editor with some values in it. The first three lines are to control the relative value of the different waveforms. Square and sawtooth waves appear louder to our ear, so they need to be at lower volumes. The volume ranges from 1.0 as full volume to 0.0 as off with 0.001 being very quiet. The last four calibrations are for frequency volume control. After any changes to the values are made, press Ctrl-o to save the changes. The changes will not take effect until the main program times out to the title page then click "Start" and slide the frequency knobs then the changes will be in effect. Don't forget that the master volume is on the Amplifier in the back of the cabinet. Use Ctrl-x to exit the editor once all values are correctly set.